Building a Dynamic Web Scraper App with Playwright and React: A Step-by-Step Guide
Last updated: Jan 11, 2025
Today we are going to build a small web scrapper app. This application will be scrapping data from Airbnb website and display it in a nice grid view. We will add a Refresh button that will be able to trigger a new scraping round and update the results. In order to make our app a bit more performant we will utilize the browser local storage to store already scrapped data so that we don’t trigger new scrapping requests every time when the browser is refreshed.
Here is how it will look like:

TL;DR
If you want to skip the reading, here 💁 is the GitHub repository with a detailed README 🙌, and here you can see the live demo.
Let’s go step by step and see how to build and the deploy the app.
We will start with the server part.
Spin up the app with Vite
We will use Vite build tool to quickly spin up a bare bone React application, equipped with TailwindCSS for styling. In order to do that run this in your terminal app:
npm create vite@latest web-scraper -- --template reactAnd then install and configure TailwindCSS as it follows:
npm install -D tailwindcss postcss autoprefixer
npx tailwindcss init -p
Add the paths to all of your template files in your tailwind.config.js file.
/** @type {import('tailwindcss').Config} */
export default {
  content: [
    "./index.html",
    "./src/**/*.{js,ts,jsx,tsx}",
  ],
  theme: {
    extend: {},
  },
  plugins: [],
}
By now you should have a brand new React application with Tailwind installed and configured.
Let’s start our work with the server part first.
The Server
Since we are building a fullstack application, the bare minimum we need to have in place is a server, a client, and an API. The API will live in the server world and the client app will call the endpoints it exposes in order to fetch the data we need to display on the front end.
HTTP Server with Express.js
We are going to use the notorious Express.js library to spin up an HTTP server that will handle our API requests. To do so follow my steps:
npm install express cors playwrightBefore we continue with the scraper part let me first explain what we are doing here.
This is a pretty simple setup of an Express server that is exposing an endpoint called “scrape“. Our client-side application (the front end) can send GET requests to this endpoint and receive the data returned as a result. What’s the important here is the async callback function that we pass to the `app.get` method. This is where we call our scraping function within a try/catch block. It will return the scraped data or an error if something goes wrong.
The last few lines indicate that our server will listen on the specified PORT, which is set to 5001 here, and display a message in the terminal to show that the server is running.
Playwright
For the scrapping functionality we will use another library that became pretty famous last few years - Playwright. Its main purpose is to serve as an e2e testing solution but, as we will see now, we can use it for scrapping the web as well. We will put the scraping function in a separate file so that we have it all in order and keep the separation of concerns in place.
Create a new folder in the root directory and name it 'utils'. Inside this folder, add a new file named scraper.js and include the following code:
const MAX_RETRIES = 3;

const validateListing = (listing) => {
  return (
    typeof listing.title === "string" &&
    typeof listing.price === "string" &&
    typeof listing.link === "string"
  );
};

export const scrapeListings = async ({ browser, retryCount }) => {
  try {
    const page = await browser.newPage();

    try {
      await page.goto("https://www.airbnb.com/", { waitUntil: "load" });

      await page.waitForSelector('[itemprop="itemListElement"]', {
        timeout: 10000,
      });

      const listings = await page.$$eval(
        '[itemprop="itemListElement"]',
        (elements) => {
          return elements.slice(0, 10).map((element) => {
            const title =
              element.querySelector(".t1jojoys")?.innerText || "N/A";
            const price =
              element.querySelector("._11jcbg2")?.innerText || "N/A";
            const link = element.querySelector("a")?.href || "N/A";
            return { title, price, link };
          });
        }
      );

      const validListings = listings.filter(validateListing);

      if (validListings.length === 0) {
        throw new Error("No listings found");
      }

      return validListings;
    } catch (pageError) {
      if (retryCount < MAX_RETRIES) {
        console.log(`Retrying... (${retryCount + 1}/${MAX_RETRIES})`);
        return await scrapeListings(retryCount + 1);
      } else {
        throw new Error(
          `Failed to scrape data after ${MAX_RETRIES} attempts: ${pageError.message}`
        );
      }
    } finally {
      await page.close();
    }
  } catch (browserError) {
    throw new Error(`Failed to launch browser: ${browserError.message}`);
  } finally {
    if (browser) {
      await browser.close();
    }
  }
};
Web Scraping
Before diving into the code, I want to briefly explain web scraping for those unfamiliar with it. The web scraping is a process of automatically reading content from websites by using a piece of software. This software is called “web scraper“. In our case the scraper would be what’s in “scrapeListing“ function.
An essential part of the scraping process is finding something in the DOM tree of the target website that can be used to select the data we want to scrape. This something is known as a selector. Selectors can be different HTML elements, such as tags (h3, p, table) or attributes like class names or IDs. Developers can use various programming techniques or features of the programming language they use to create the scraper, aiming for better success when implementing the selecting part of the scraper.
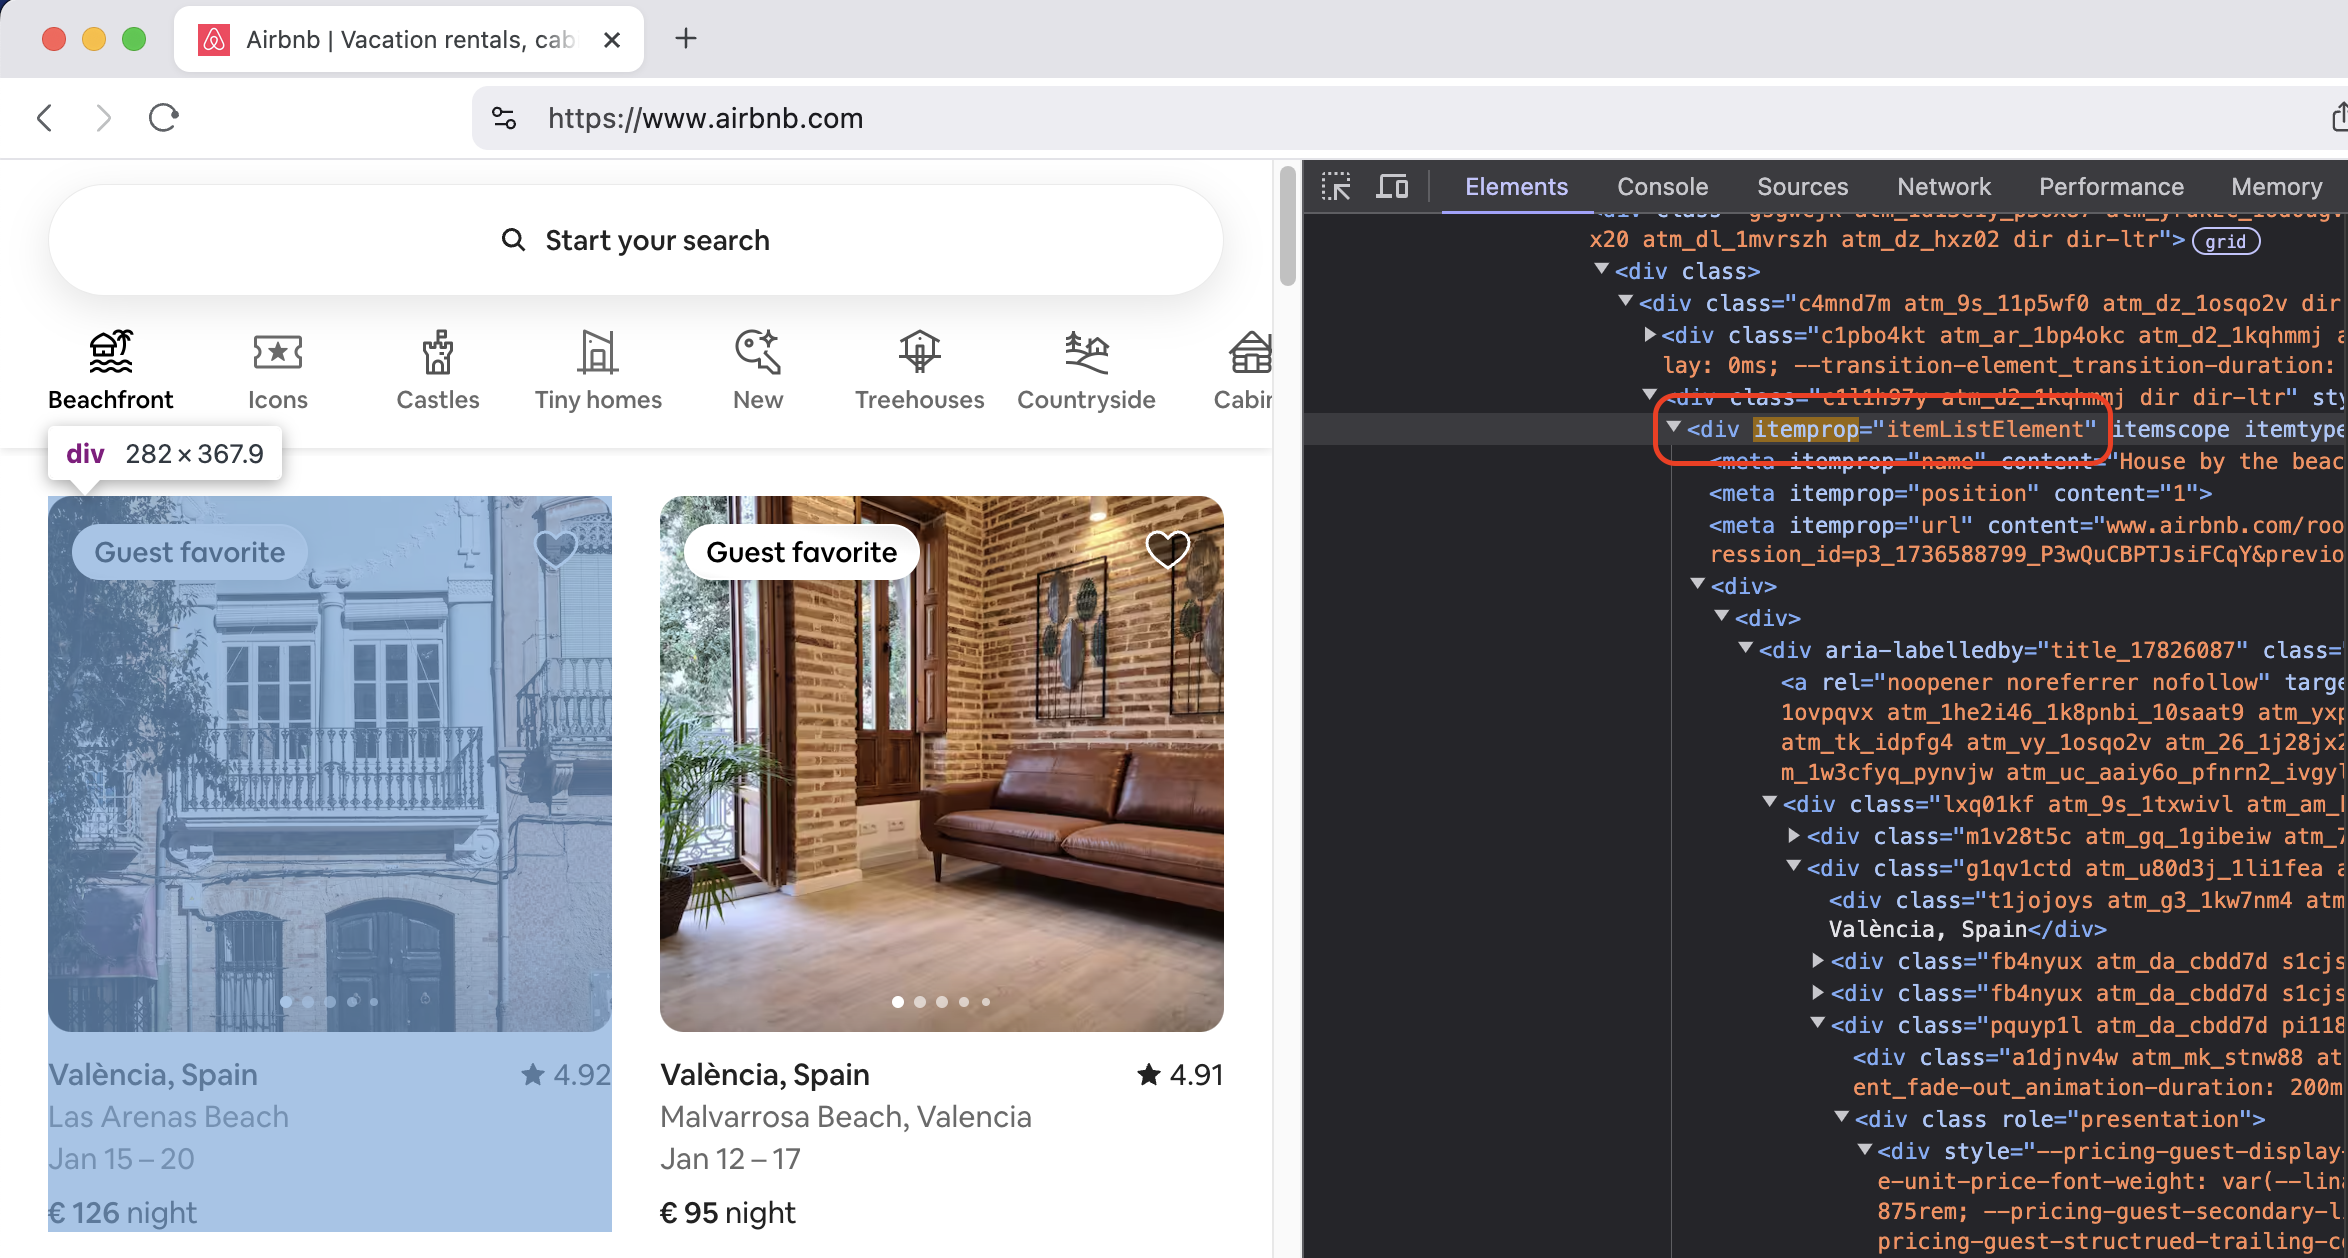
In our case, we use [itemprop="itemListElement"] as the selector. But you might wonder, how did we figure this out? How do you know which selector to use? This is where it gets tricky. You have to manually inspect the DOM tree of the target website and determine what would work best. That is, unless the site provides an API specifically designed for scrapers. Here is how this looks like in practice - this is a screenshot from Airbnb website:
Usually people need the information they are scraping for some purpose, which means they need to store it somewhere and then process it. This processing often involve some kind of visualization of the data. This is where our client application come into play.
We will store the results of our scraping in the browser's local storage. Then, we will easily display them in a grid layout using React and TailwindCSS. But before this let’s go back to the code to understand how the scraping process is done.
Retry Mechanism
At the top of the file, there's a constant MAX_RETRIES used to implement a retry mechanism. This tactic is often used by web scrapers to bypass or overcome protections some websites have against scraping. We will see how it is used below.
It's important to mention the legal aspect as well—always respect the terms and conditions or the privacy policy of the website you plan to scrape. Use these techniques only to handle technical challenges, not to break the law.
A small helper function follows that is used to validate the received data. Nothing interesting here.
Next is the main scraping function. We pass the browser object, provided by Playwright, and the number of retry attempts as arguments to the function. There are two try/catch blocks to handle possible failures: one for launching the browser (in headless mode, meaning you won't see anything) and one for the scraping process. In the latter, we use Playwright's features to request the website, wait until the page is fully loaded, and then locate the selector we defined. In the callback function we pass to $$eval, we access the elements returned by the scraping, allowing us to process them and obtain the desired data. In this case, I use three selectors to fetch the title, price, and link of the property. The first two are class names, and the last is the HTML tag <a>.
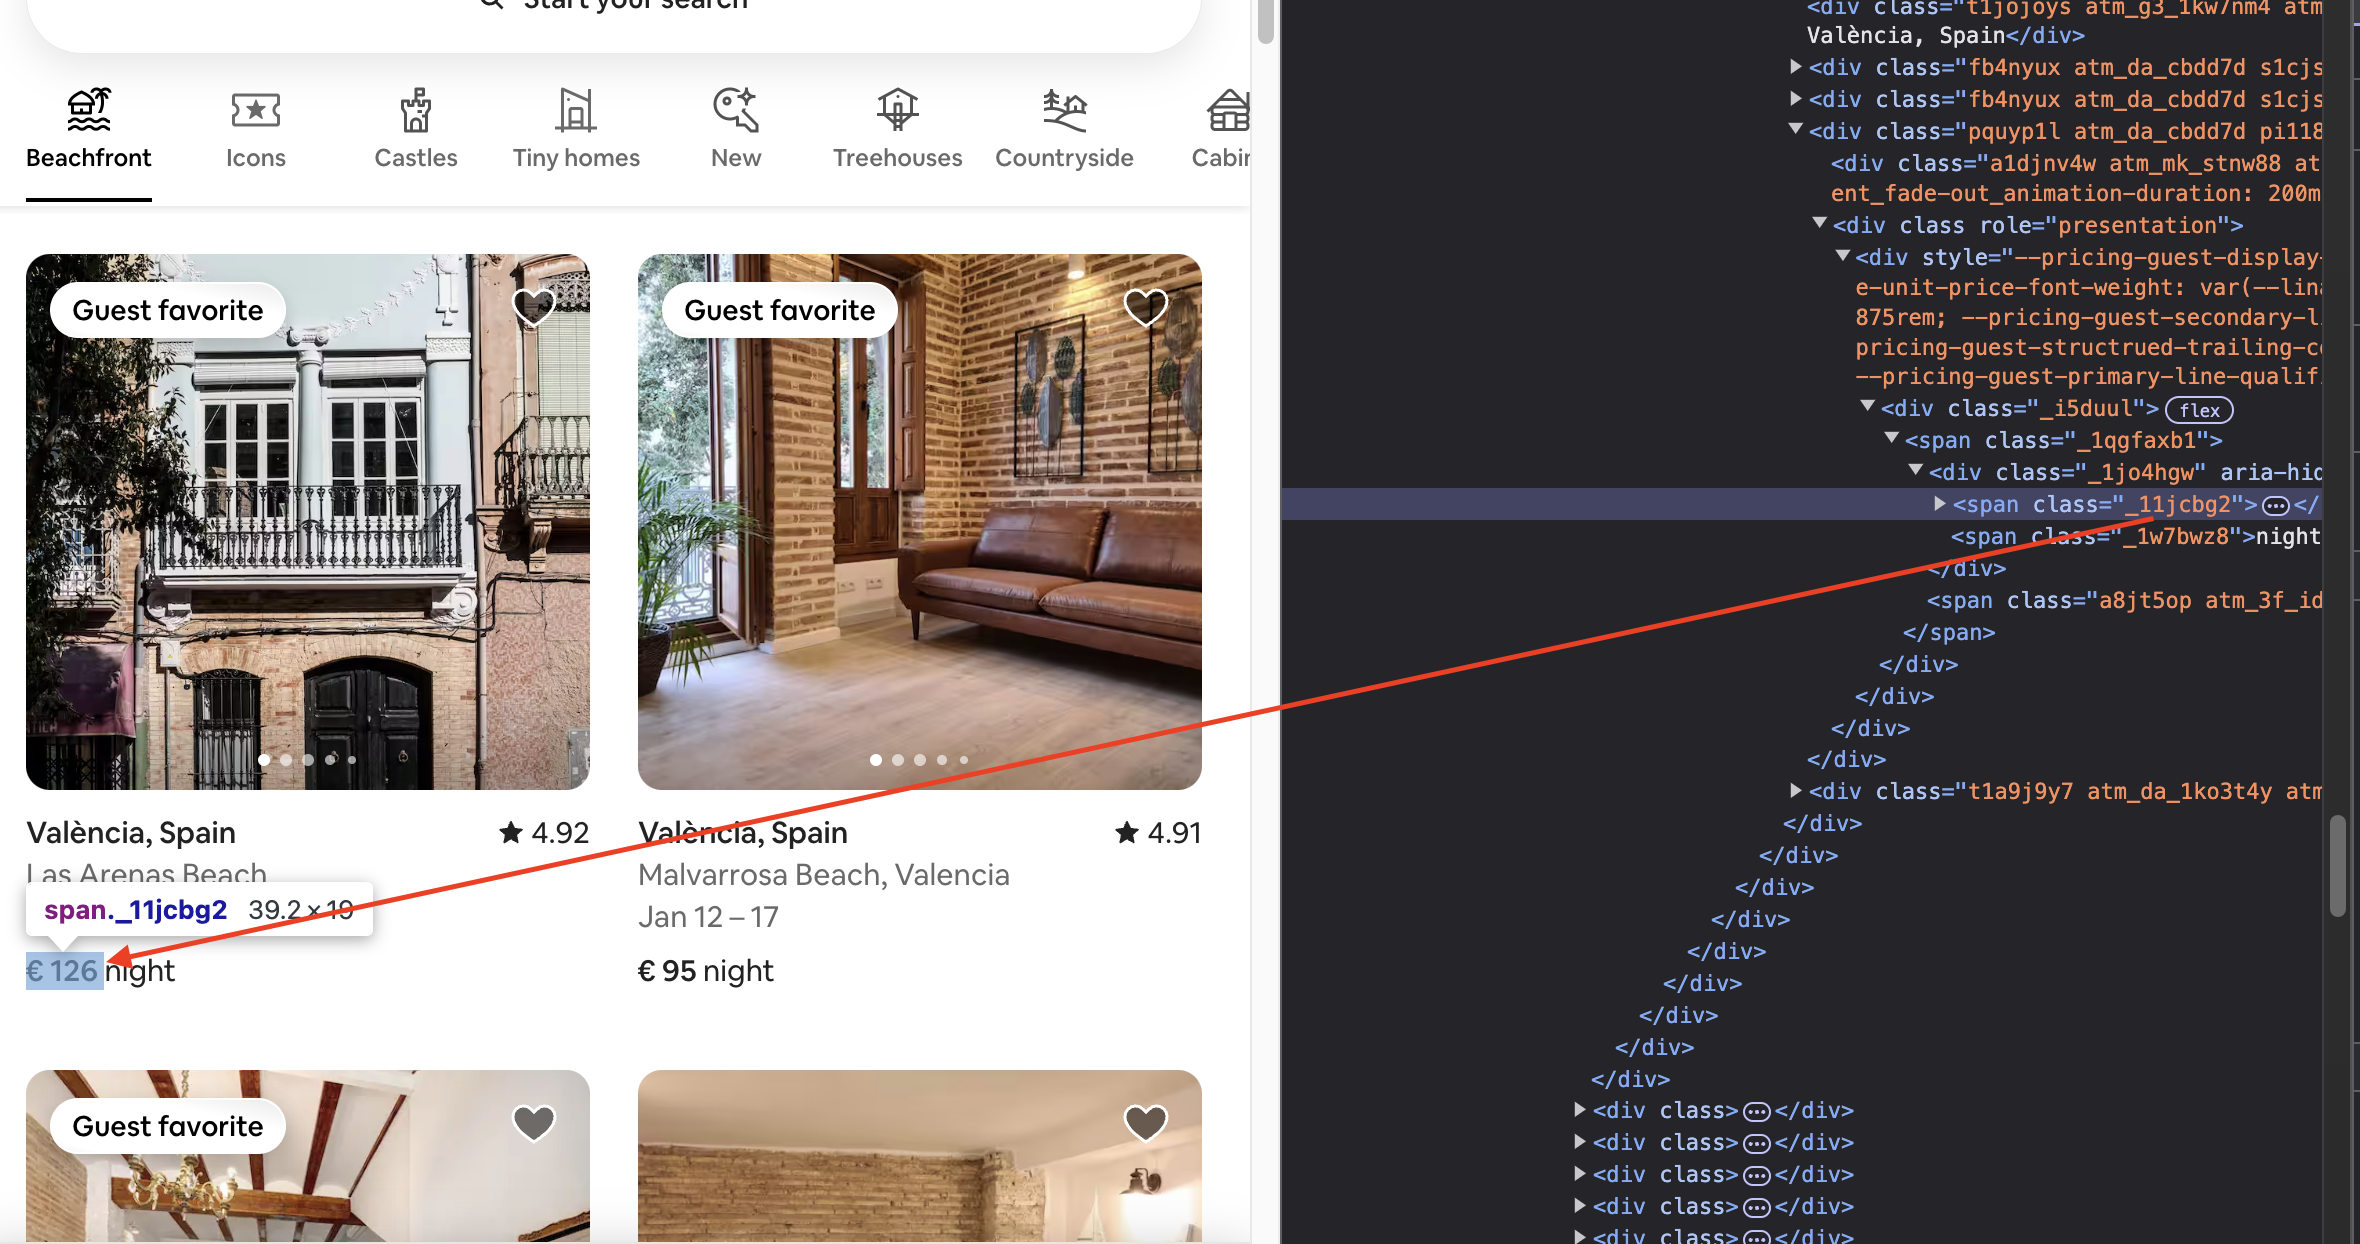
Then we return an object, { title, price, link }, with the fetched data, i.e. the values of the three properties. And in the end of the try part we validate the results before returning them to the front end.
What follows in the catch part is the implementation of the aforementioned retry mechanism.
 } catch (pageError) {
      if (retryCount < MAX_RETRIES) {
        console.log(`Retrying... (${retryCount + 1}/${MAX_RETRIES})`);
        return await scrapeListings(retryCount + 1);
      } else {
        throw new Error(
          `Failed to scrape data after ${MAX_RETRIES} attempts: ${pageError.message}`
        );
      }
    }
If an error occurs during the reading process, we enter the catch phase and check if the retry count is below the maximum limit we set. If it is, we try again by running the function recursively. Otherwise, we throw an error indicating that the scraping failed and the maximum retry attempts have been reached.
That's all we need to do a basic web scraping of the Airbnb homepage.
You may see all this in the Github repo of the project so there is no need to worry if you miss something here (or I miss to explain it well in that matter :smile:).
The Frontend
Now it's time to put the scraped data to use.
Let's display the last 10 properties in a grid layout, allowing users to open them by clicking on their links. We will also add a Refresh feature that lets users perform a new scrape to get the most up-to-date data.
This is how the structure of the front end part of the project looks like.
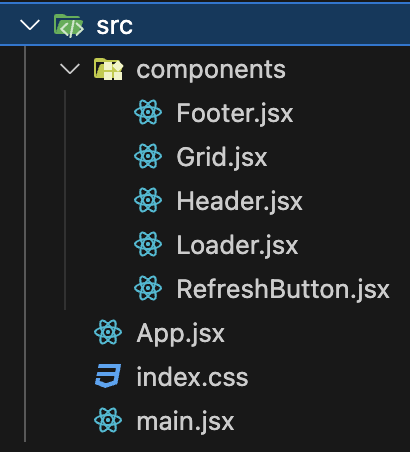
We have a simple app structure: one main container (App.jsx) that holds all the components and includes some logic for making requests to the API and storing the data in local storage.
import { useEffect, useState } from "react";
import { useLocalStorage } from "@uidotdev/usehooks";
import axios from "axios";
import Footer from "./components/Footer";
import Header from "./components/Header";
import RefreshButton from "./components/RefreshButton";
import Grid from "./components/Grid";
import Loader from "./components/Loader";

function App() {
  const [listings, setListings] = useLocalStorage("properties", []);
  const [loading, setLoading] = useState(false);
  const [error, setError] = useState("");

  const fetchListings = async () => {
    setLoading(true);
    setError("");
    setListings([]);

    try {
      const response = await axios.get("http://localhost:5001/scrape");
      if (response.data.length === 0) {
        throw new Error("No listings found");
      }
      setListings(response.data);
    } catch (err) {
      setError(
        err.response?.data?.error ||
          "Failed to fetch listings. Please try again."
      );
    } finally {
      setLoading(false);
    }
  };

  useEffect(() => {
    if (listings.length === 0) {
      fetchListings();
    }
  }, []);

  return (
    <div className="flex flex-col items-center justify-center min-h-screen bg-gray-100">
      <Header />
      <RefreshButton callback={fetchListings} loading={loading} />
      <main className="flex flex-col items-center justify-center flex-1 w-full px-4 relative">
        {error && <p className="text-red-500">{error}</p>}
        {loading ? <Loader /> : <Grid listings={listings} />}
      </main>
      <Footer />
    </div>
  );
}

export default App;
All components are placed in the components directory (this is what I call surprise, ah:)). Most of the components are quite simple, and I included them to give the app a more complete appearance.
The Header displays the top bar. The RefreshButton is used to send a new request and get the latest data. In the <main> section, we either show an error message if fetching fails, or we display a Loader component and a Grid component. The loading part is straightforward. The Grid component is the interesting one. We pass the scraping results to it using a prop called 'listings'. Inside, we use a simple map() function to go through them and display the properties. We use Tailwind to style the grid, ensuring the properties are neatly listed and look good on both desktop and mobile screens.
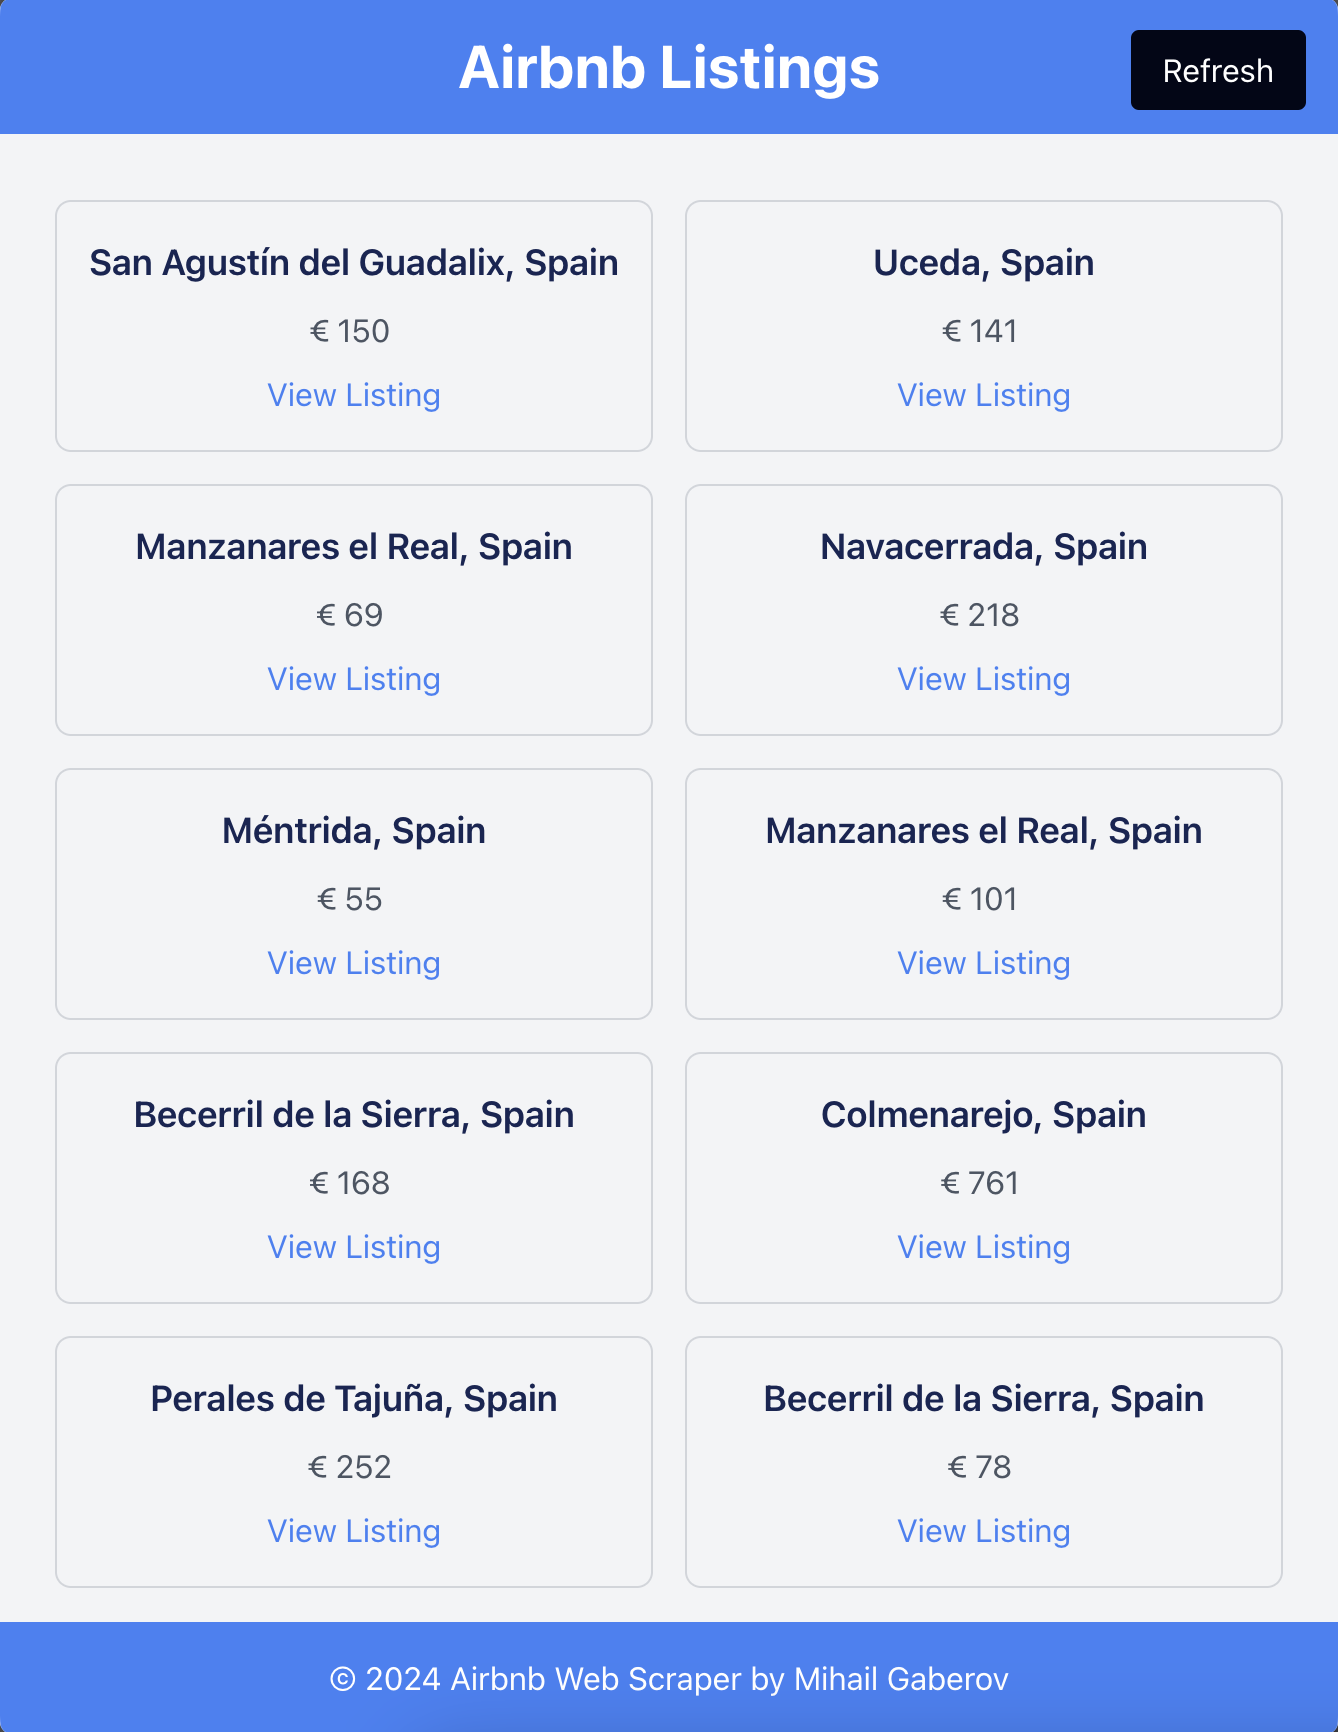
And in the end with we have the Footer component that renders simple bar with text. Again it’s added just for completeness.
Deploy to render.com
Maybe a little over a year ago, I needed a place to deploy full-stack applications, ideally for free, since they were just for educational purposes. After some research, I found a platform called Render and managed to deploy an app with both client and server parts, getting it to work online. I left it there until now. Since our scraper requires both parts to function properly, we will deploy it there and have it working online, as you can see here.
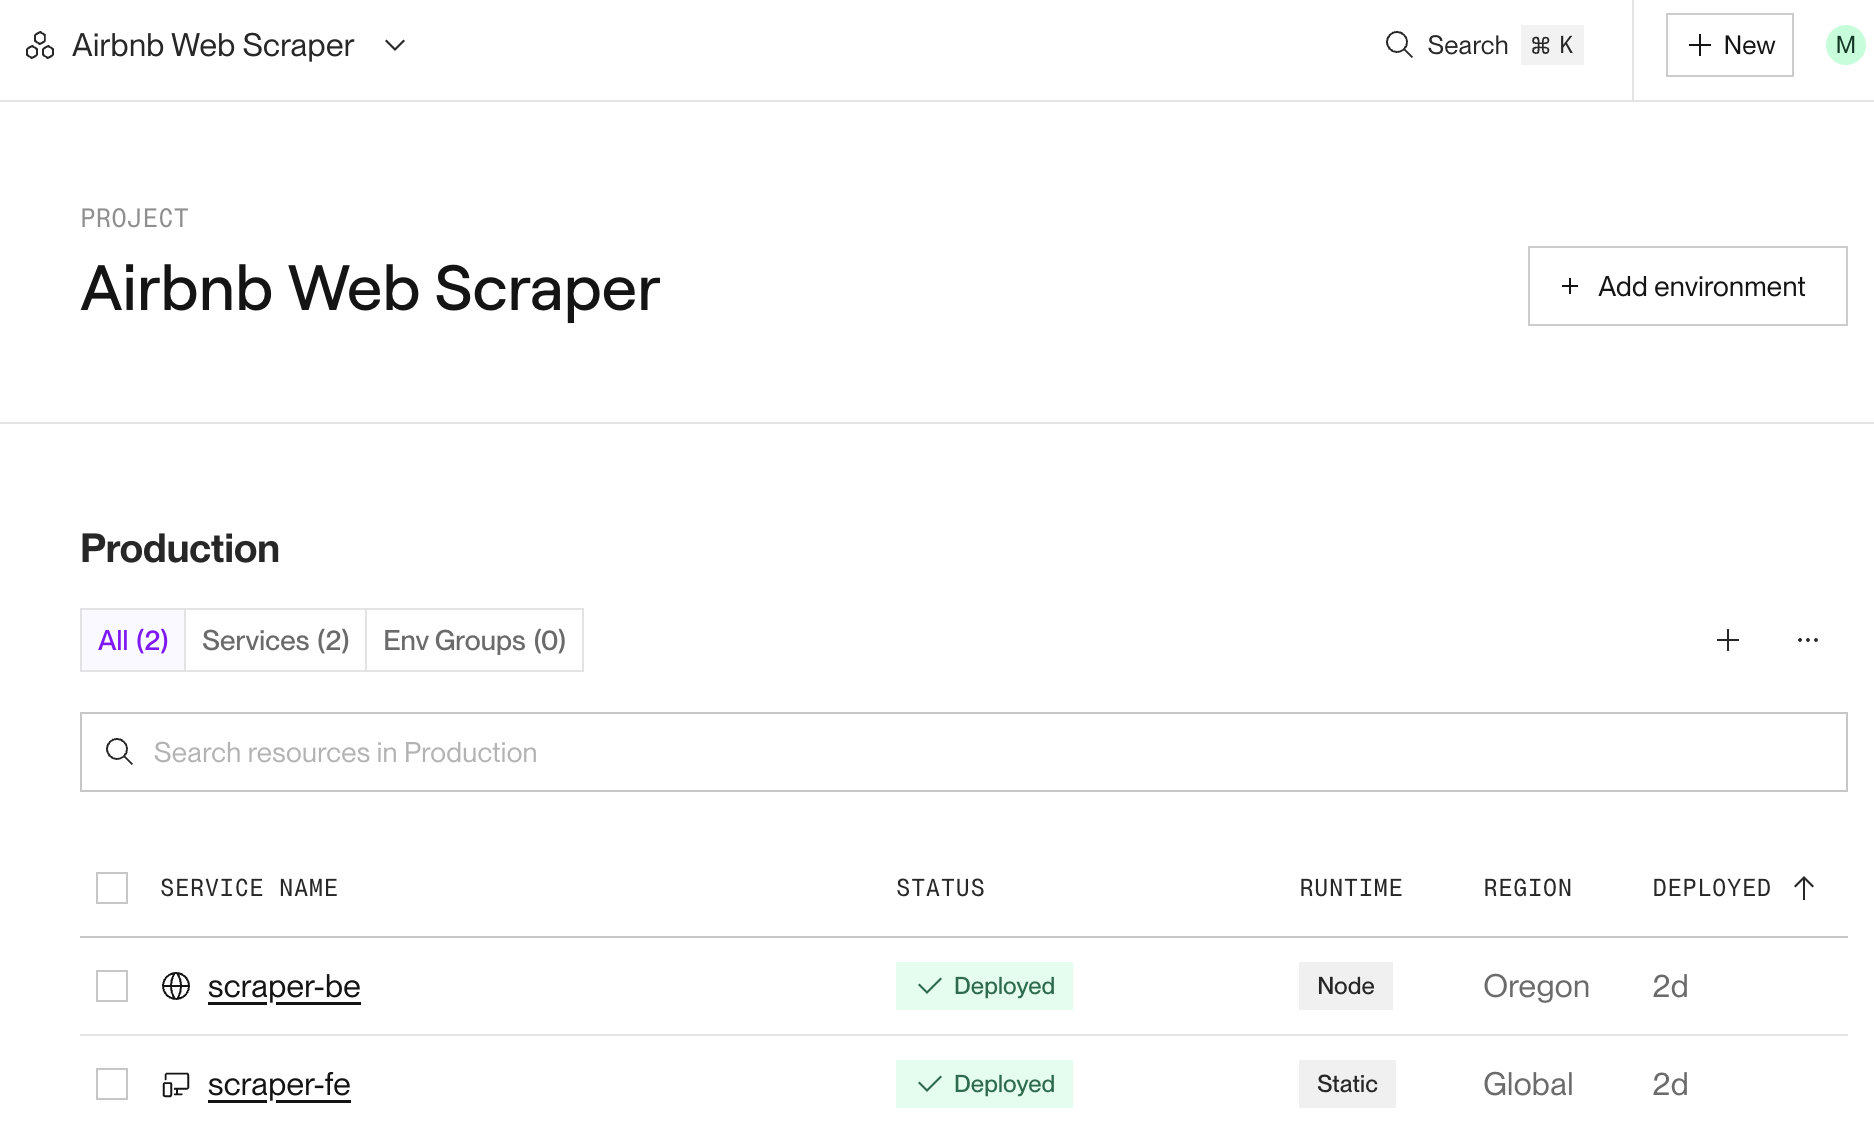
To do this, you need to create an account with them and use their dashboard application. The process is simple, but I'll include a few screenshots below for clarity.
This is the Overview page where you can see all your projects.

Here is the Project page where you can view and manage your project. In our case, we see both the server and the client app as separate services.
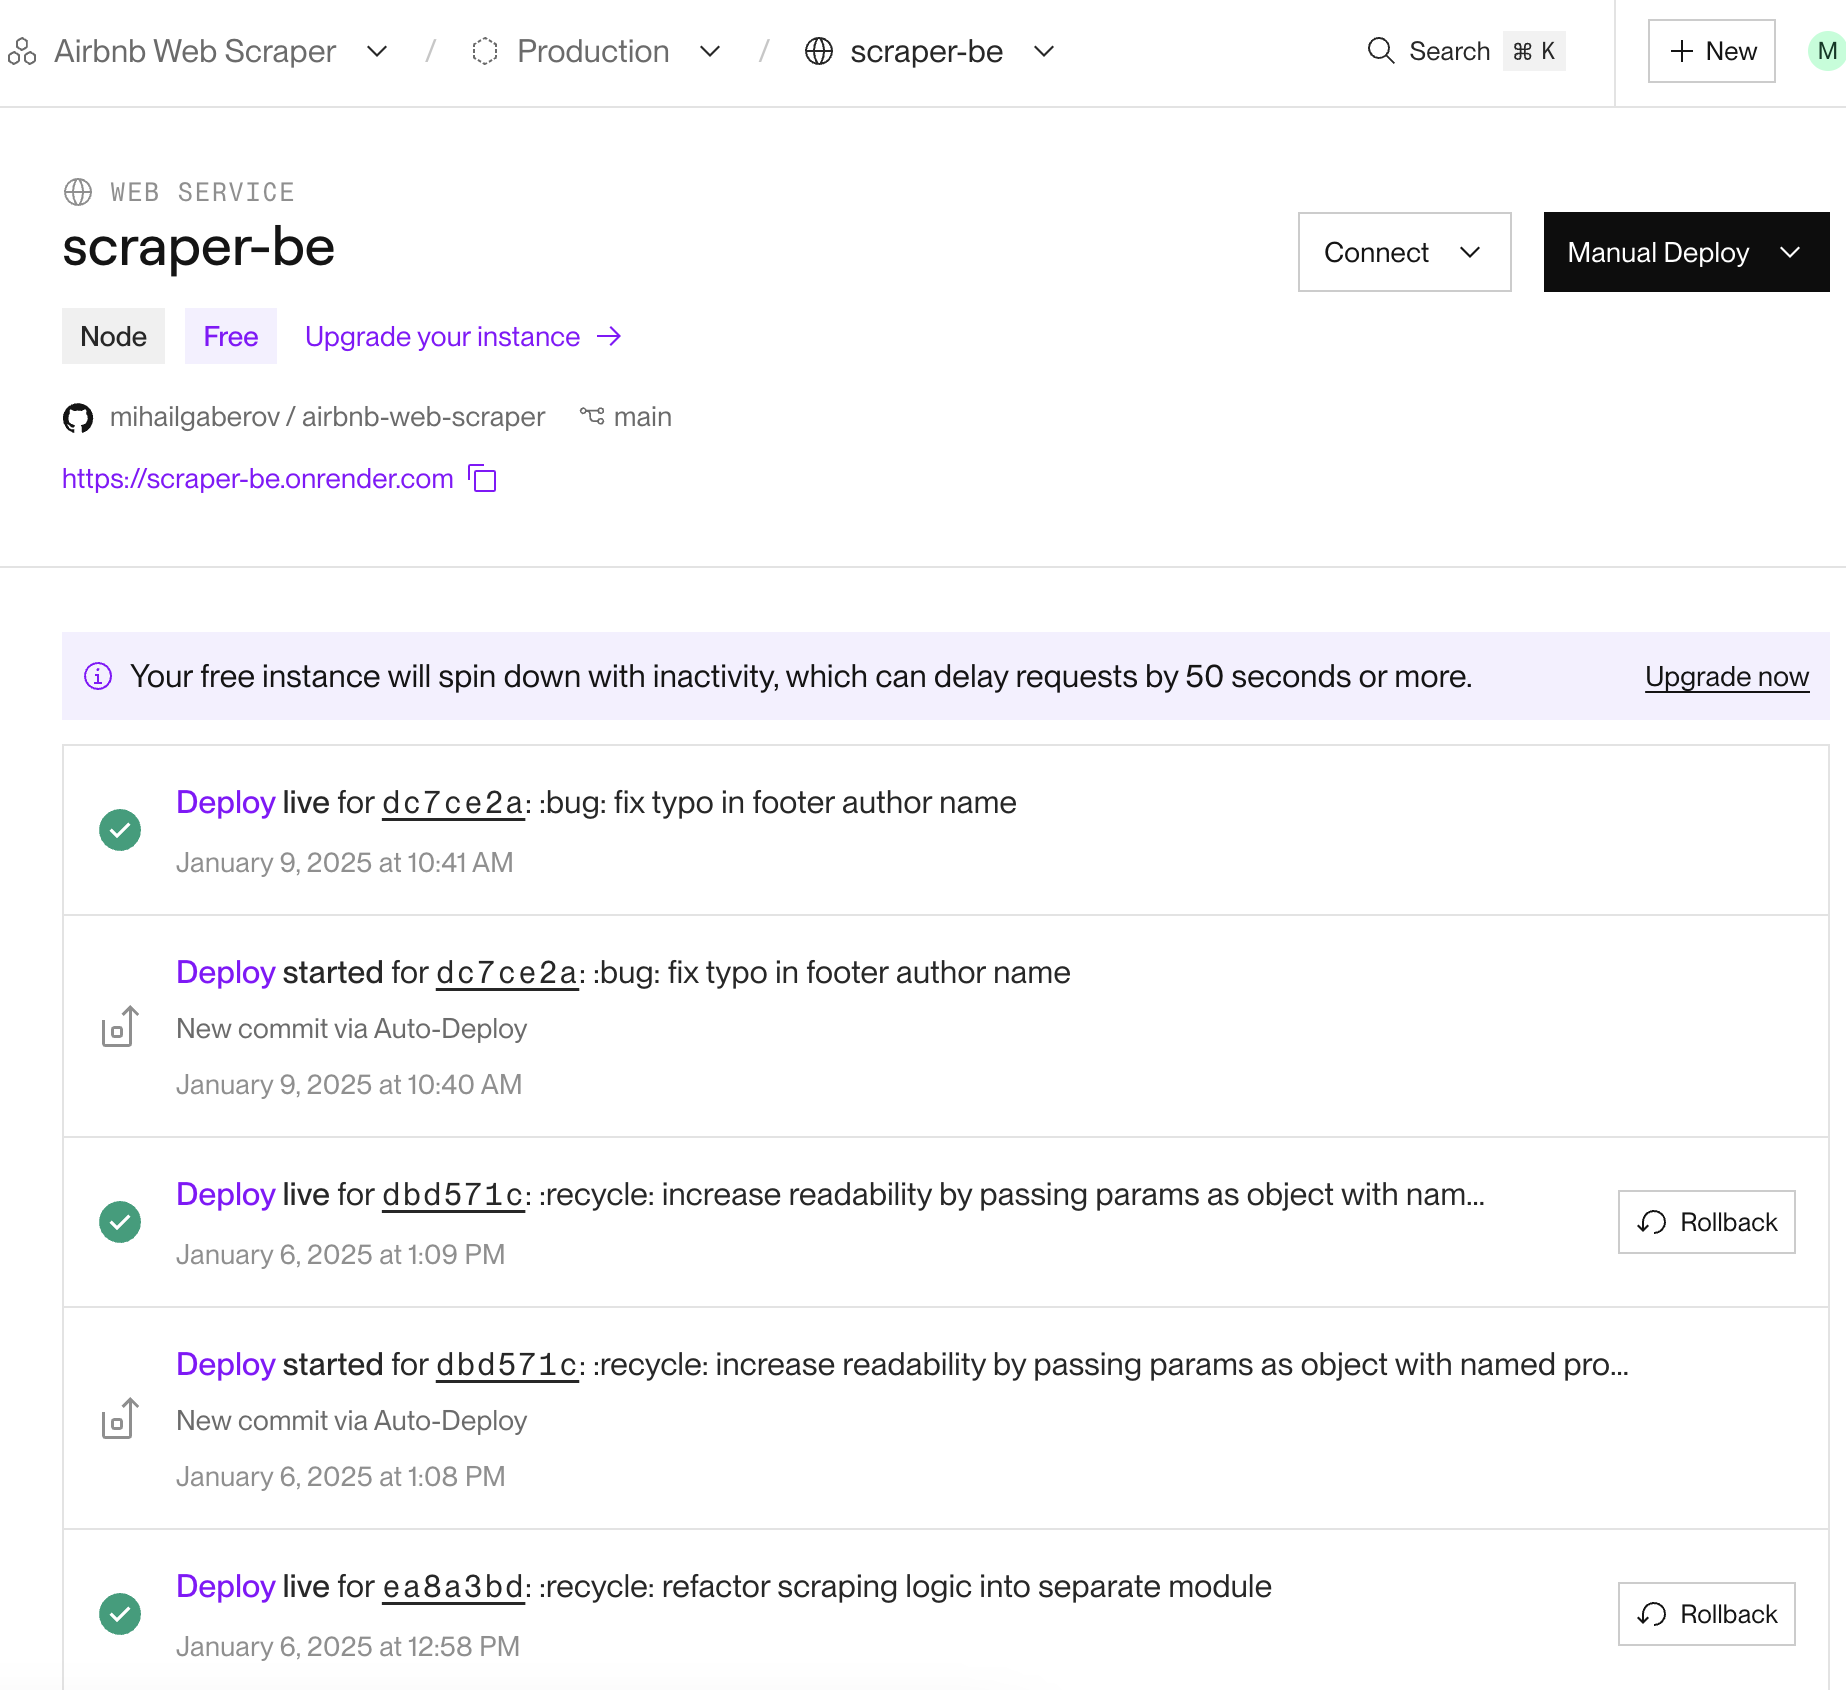
You can click on each service to open its page, where you can view the deployments and the commits that triggered them. You can find even more details if you explore further.
You should be able to manage the deployment process on your own, as everything is clearly explained. However, if you need help, feel free to reach out.
I should mention that I am not affiliated with Render in any way and I am not receiving any benefits for mentioning them here.
Conclusion
In conclusion we may say that while a web scraper app can be a powerful tool for gathering data, there are several areas for improvement and important considerations to keep in mind.
Firstly, enhancing the app's performance and efficiency can be achieved by optimizing the scraping process and ensuring that the data is stored and processed effectively. Additionally, implementing more robust error handling and retry mechanisms can improve the reliability of the scraper.
On another side, ethical scraping is crucial, and it's important to always respect the terms of service and privacy policies of the websites you are scraping. This includes not overloading the website with requests and ensuring that the data is used responsibly. Always seek permission if required and consider using APIs provided by the website as a more ethical and reliable alternative.
Lastly, respecting the law is paramount. Ensure that your scraping activities comply with legal regulations and guidelines to avoid any potential legal issues. By focusing on these aspects, you can build a more effective, ethical, and legally compliant web scraper app.
← Go home